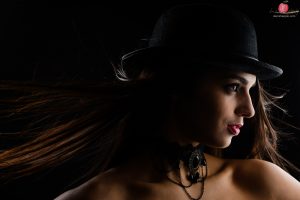
Nikon D810, Nikkor 24-70 f/2.8 @ 70mm, 1/200sec @ f/8, ISO 64, 2 x Remotely fired Interfit S1 monolights
So a few months back, I was working on the Interfit stand at The Photography Show with the beautiful Roisin. I wanted to show people that with just a very simple setup you could do a lot, and create very different looks really easily.
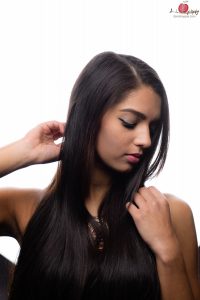
Nikon D810, Nikkor 24-70 f/2.8 @ 70mm, 1/60sec @ f/4, ISO 64, 2 x Remotely fired Interfit S1 monolights

Nikon D810, Nikkor 24-70 f/2.8 @ 70mm, 1/200sec @ f/8, ISO 64, 2 x Remotely fired Interfit S1 monolights
I have already mentioned about testing this setup in a previous blog post about the S1 (scroll towards the bottom).
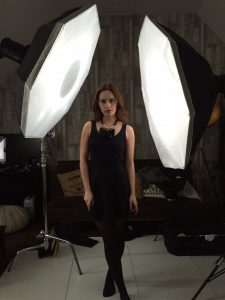
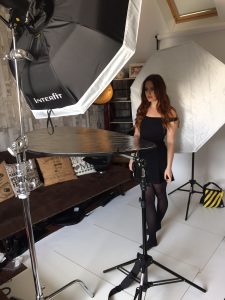
First, let’s have a look at the setup, taken from another shoot which I’ll be sharing more of in the near future;
That’s two S1 lights with some large softboxes pretty much directly opposite each other, set at (more or less) the same power intensity. The power level is irrelevant for the time being, as it will depend on the distance between them to the subject, as well as shooting direction (more on that in a minute).
Two things to note – one of these ‘softboxes’ is actually a beauty dish (the giveaway is the dark round patch in the centre of the softbox on the left) with a diffuser/sock over the top of it. Why that particular combination? Simple – because it’s what I had to hand at the time. Given the choice, I’d opt for two plain softboxes rather than any beauty dishes. But one of the two should definitely be a softbox proper, as you’ll want to avoid that dark patch as you’ll see in a minute. The other thing to note is the use of a C-stand for one of the lights. This will also become relevant in a minute.
Provided you are just shooting with the lights either side, the dark patch won’t be visible in this setup. So once you’ve set up, you depending on the look you want, you now have two options; move the subject or move the camera. No moving lights around (except for maybe a bit of height adjustment) – they are stuck to the floor (for the purposes of this demonstration).
In the first shot shared at the top of this blog, Roisin is fairly close to the right softbox (hence why that side of her is brighter) and standing pretty much in the middle of that softbox from front to back. In the shot below, we moved Roisin much closer to me, so that the softboxes are almost completely behind where her – as a result of which only her sides are lit and the front of her body almost disappears.

Nikon D810, Nikkor 24-70 f/2.8 @ 52mm, 1/200sec @ f/4, ISO 64, 2 x Remotely fired Interfit S1 monolights
A great way to create some clever silhouettes.
Now, if you move yourself instead of the model, by going 90 degrees in one direction, i.e. so that you are standing with your lens just underneath the softbox, you can create something entirely different again (setup as per below, minus the reflector)
Now you’ll see why a C-stand with a boom arm could come in handy. It’s hard to tell in that setup shot, but I have the boom arm tilted ever so slightly, so that I can be directly underneath the centre of the beauty dish softbox. Again, I don’t want the beauty dish behind the model because then that centre dark spot would become visible. But for the purposes of a nicely lit photo, we have no such problem if it’s acting as your main light;

Nikon D810, Nikkor 24-70 f/2.8 @ 70mm, 1/200sec @ f/8, ISO 64, 2 x Remotely fired Interfit S1 monolights
Should also be obvious that the bigger the softboxes, the more space you give your subject to move around with the background behind them… too small a softbox and all you’ll be able to shoot is a very tightly cropped headshot. Larger softboxes give you plenty of room.

Nikon D810, Nikkor 24-70 f/2.8 @ 58mm, 1/200sec @ f/4, ISO 64, 2 x Remotely fired Interfit S1 monolights
You obviously need to be a bit careful how close you have the subject to the background, as you will start to get a really heavy spilling of light onto the subject which not only can kill contrast but also make the subject look like they are merging together with the white. This can look quite ethereal so if you are after a fantasy glow, it’s an easy way to get that look to.
I really like the drama you get without any fill. You can also add in a reflector (as is visible in the setup shot above) and you get yourself a fairly simple and highly effective headshot for corporate type shoots, LinkedIn profiles and such.

Nikon D810, Nikkor 24-70 f/2.8 @ 70mm, 1/250sec @ f/5, ISO 64, 2 x Remotely fired Interfit S1 monolights
It’s not something I would recommend most times, mainly because of the painful handling of the spill (particularly visible on black suits, such as around the shoulders in the above shot) but if all the image will do is reside on LinkedIn, you can get away with it. Especially as you can set up super quick and give the client multiple looks in a very short space of time. The solution would be to move the subject further from the background, use a longer lens to allow for tighter crop to avoid the softbox being visible, but often you have neither time or space to go with the ‘ideal’ solution.
Of course, you could also opt to work with just one light and create something totally different again. Here’s with the beauty dish above (and slightly to the left) of camera;

Nikon D810, Nikkor 24-70 f/2.8 @ 70mm, 1/250sec @ f/5, ISO 64, 1 x Remotely fired Interfit S1 monolight
And here’s with just a single side-on softbox;

Nikon D810, Nikkor 24-70 f/2.8 @ 70mm, 1/200sec @ f/4, ISO 64, 1 x Remotely fired Interfit S1 monolight
So there you have it. With even the smallest of studio spaces and minimal equipment, you can create lots of different looks, even within the time constraints of a single shoot.
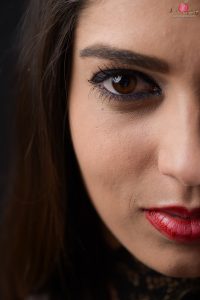
Nikon D810, Nikkor Micro 105mm VR f/2.8, 1/200sec @ f/8, ISO 64, 1 x Remotely fired Interfit S1 monolight
And as a little reminder, readers of this blog can now get a 10% discount on any Interfit products including the S1, softboxes and lightstands if you purchase directly from Interfit’s own shop by using the promo code JAKOB10 (case sensitive so make sure you use all CAPITALS) at the checkout billing page. I get a small commission from sales which will go towards upkeep of this site, amongst other things, so if you do use it, thanks!





Comment
Great content! Super high-quality! Keep it up! 🙂